Second post of today guys!
This time I'm going to show you some editing using Adobe Photoshop CS5. More specific, how to make parts of a picture colorful, while keeping the rest of the photo black and white.
To do this the first thing you need is a start out picture. I chose this one:
After opening the picture in photoshop remember to make a layer copy of your picture by right clicking it in the selection area and choosing "Make background copy". Then take a look at the selection bar at the top of your screen and click on the "Image" menue, then you select "Image adjustment", and here you will find a selection called "Gradient Map". Now click on that.
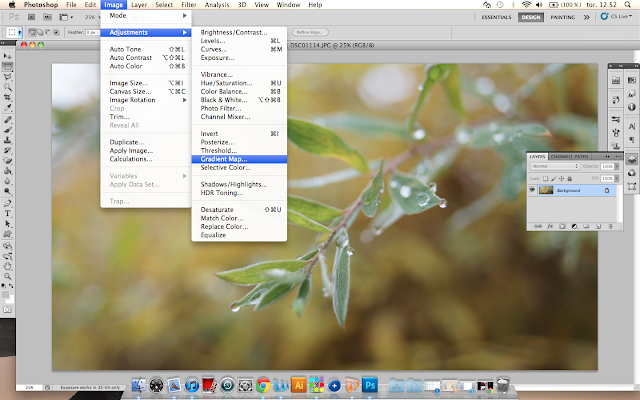
Choose black and white and click ok. You should now have a black and white picture.
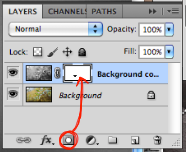
 When you have done this, locate the selection area and click on the black and white picture. Then click on the layer mask button (which you can see on the picture to your right.
After doing all this, choose the brush tool. You are going to use this tool to "Color in" a pice of the black and white picture, you can find it in the selection bar to your left. Now if you look at the selection bar at the top of the screen, here you can choose the sise and style of your brush tool. I wold go for a rather small brush with feathered edges.
At the same time, make sure that you have a black and white color square (see bottom red circle of selection bar to the left) Switching between having a black square at the top and a white square at the top; will make it possible to either "color in" an area or make it black and white. (you can change between the two using the letter X)
While doing this your screen should be looking something like this.
This time I'm going to show you some editing using Adobe Photoshop CS5. More specific, how to make parts of a picture colorful, while keeping the rest of the photo black and white.
To do this the first thing you need is a start out picture. I chose this one:
After opening the picture in photoshop remember to make a layer copy of your picture by right clicking it in the selection area and choosing "Make background copy". Then take a look at the selection bar at the top of your screen and click on the "Image" menue, then you select "Image adjustment", and here you will find a selection called "Gradient Map". Now click on that.

Choose black and white and click ok. You should now have a black and white picture.

After doing all this, choose the brush tool. You are going to use this tool to "Color in" a pice of the black and white picture, you can find it in the selection bar to your left. Now if you look at the selection bar at the top of the screen, here you can choose the sise and style of your brush tool. I wold go for a rather small brush with feathered edges.
At the same time, make sure that you have a black and white color square (see bottom red circle of selection bar to the left) Switching between having a black square at the top and a white square at the top; will make it possible to either "color in" an area or make it black and white. (you can change between the two using the letter X)
While doing this your screen should be looking something like this.
Notice, this picture is zoomed in. This helps when "coloring in" the different areas.
Then comes the final result. You should now have a picture which is part black and white, and part colored.
I hope you enjoyed this tutorial, and that it helped you a bit while working with photoshop and editing.
Here is a picture of my final result.


